Double French Braid Ponytail Tutorial: The Ultimate Step-by-Step Guide
Ever rushed out the door with your hair in a boring, basic ponytail and wished you’d done something—anything—more interesting?
Yeah, me too.
But here’s the thing: you don’t need hours or professional skills to create a hairstyle that actually turns heads. The double French braid ponytail tutorial is your secret weapon. It looks intricate and polished, but I promise you, it’s way easier than it seems.
In this tutorial, I’m going to break down every single step so you can master this versatile braided ponytail style. Whether you’re heading to the gym, a wedding, or just want to feel put-together on a random Tuesday, this hairstyle has got you covered.
Let’s jump in.
Before you start braiding, avoid a few easy slip-ups—here are the common haircare mistakes that can make hair look frizzy or dull.
Why the Double French Braid Ponytail is Your New Go-To Style
Before we get our hands dirty (well, in our hair), let me tell you why this hairstyle deserves a permanent spot in your rotation.
First off, it’s incredibly practical. The French braids keep all your flyaways under control, and the ponytail keeps everything secure. No hair falling in your face during your workout or while you’re trying to focus at work.
Second, it’s ridiculously versatile. Seriously. I’ve worn this style to:
- Morning yoga classes and intense gym sessions
- Casual coffee dates and weekend brunches
- Formal events like weddings and galas
- Long work days when I need to look professional
- Music festivals and outdoor concerts
What I love most about this tutorial is that once you learn the basic technique, you can customize it a million different ways. Make it sleek and polished or messy and bohemian—it works either way.
Understanding the French Braid Technique
Now here’s where it gets interesting. If you’ve never done a French braid before, don’t panic.
The French braid is actually one of the easiest braiding techniques once you understand the basic pattern. Unlike a regular three-strand braid, you’re constantly adding new hair as you work your way down.
Think of it like this: you start with three strands at the top, cross them over each other (right over middle, left over middle), then grab a small section of hair from the side and add it to the next strand before crossing it over again.
That’s it. You’re just adding hair and crossing. Once your hands learn the rhythm, it becomes almost automatic.
The key difference between French braids and Dutch braids (also called reverse French braids)? French braids cross over the middle strand, while Dutch braids cross under. For this double French braid ponytail, we’re using the classic over technique.
What You’ll Actually Need
Good news: you probably already have everything you need sitting in your bathroom drawer.
Essential Supplies:
- Hair brush or wide-tooth comb
- Hair ties or elastic bands (I recommend clear or matching your hair color)
- 5-10 bobby pins
- Hairspray (optional but recommended)
Nice to Have:
- Texturizing spray or dry shampoo
- Tail comb for precise parting
- Small hand mirror (to check the back)
- Hair accessories like ribbons or decorative clips
If your hair is super slippery or freshly washed, definitely grab that texturizing spray. Trust me on this one—it makes braiding SO much easier.
Does Your Hair Length Matter?
You might be wondering if your hair is long enough for this style.
Here’s the honest truth: the double French braid ponytail works best on hair that’s at least shoulder-length. But don’t worry if your hair is shorter—you can still do the braids and create a smaller ponytail.
Hair Length Guide:
- Long hair (past shoulders): Perfect! You’ll have plenty to work with and your ponytail will be nice and full
- Medium hair (shoulder-length): Great! This actually works beautifully with medium-length hair
- Shorter hair (chin-length to shoulders): Still doable! Your ponytail will be smaller but the braids add so much style
- Layered hair: No problem at all—just expect a few shorter pieces that might need extra pinning
In my experience, this style actually works better on hair that’s a bit textured or hasn’t been washed in a day or two. Second-day hair has more grip and holds braids way better than squeaky-clean hair.
Step-by-Step Double French Braid Ponytail Tutorial
Alright, let’s do this. I’m breaking down every single step so clearly that even if you’ve never braided before, you’ll be able to follow along.
Step 1: Brush and Prep Your Hair
Start by brushing through all your hair to remove every single tangle. I can’t stress this enough—trying to braid tangled hair is frustrating and makes the final result look messy.
Preparation tips:
- Brush from the ends up to avoid breaking hair
- If your hair is freshly washed, apply texturizing spray or dry shampoo to add grip
- Lightly mist with water if your hair is super staticky
This prep work only takes about two minutes, but it makes a huge difference in how smooth your braiding process goes.
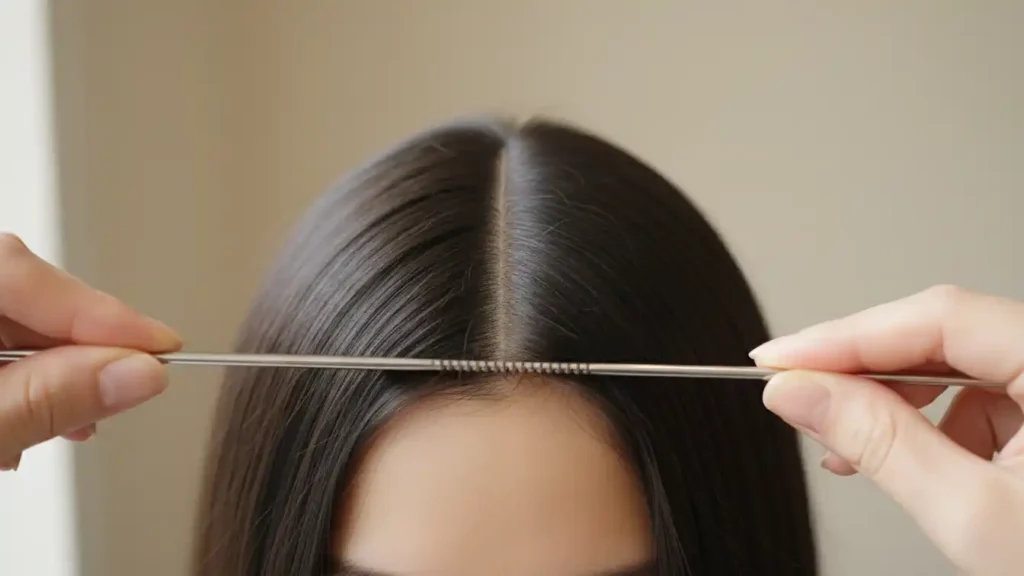
Step 2: Create Your Center Part
Use the end of your tail comb (or just your fingers) to create a clean center part from your forehead all the way down to the nape of your neck.
The goal is to divide your hair into two equal sections—one on the left, one on the right.
Pro tip: If you’re worried about making your part perfectly straight, stand in front of a mirror and use your nose as a guide. Line up the part with the center of your nose and forehead.
Clip or tie one section out of the way while you work on the first braid. This keeps things manageable and prevents hair from the other side from sneaking into your braid.
Step 3: Start the First French Braid
Let’s tackle the right side first (though you can absolutely start with the left if that feels more natural).
Here’s exactly what to do:
- Grab a section of hair about 1-2 inches wide at the front of your hairline
- Divide this section into three equal strands
- Hold the right strand in your right hand, the middle strand between your thumbs, and the left strand in your left hand
- Cross the right strand over the middle strand (right becomes the new middle)
- Cross the left strand over the new middle strand
You’ve just completed the first cycle of your French braid!
The adding hair part: Before you cross the right strand over again, grab a small section of hair from the right side of your head and add it to the right strand. Then cross this combined strand over the middle.
Do the same on the left side: grab hair from the left, add it to the left strand, cross over the middle.
Common beginner mistake: Adding too much hair at once. Keep your added sections small and consistent—about the width of your thumb works perfectly.
Step 4: Continue Braiding Down
Keep repeating that pattern: add hair to the right, cross over, add hair to the left, cross over.
Things to keep in mind:
- Maintain consistent tension throughout—not too tight (that hurts!), but snug enough that the braid holds together
- Keep the braid close to your scalp for a neater appearance
- Try to add equal amounts of hair each time you cross to keep the braid balanced
As you work your way down, you’ll start to see the beautiful French braid pattern emerge along the side of your head.
Continue until you reach the nape of your neck and have incorporated all the hair from that side.
Step 5: Finish and Secure the First Braid

Once you’ve added all the hair from the right side and reached the nape, you’re going to switch techniques.
Now:
- Continue braiding the remaining length using a regular three-strand braid (no new hair added)
- Keep braiding down as far as you want—I usually go about halfway down the length
- Secure the end with a small, clear elastic band
Don’t stress about perfection at this point. We’ll adjust everything later when we combine both braids into the ponytail.
Step 6: Repeat on the Left Side
Time to create your second French braid!
Follow the exact same process:
- Unclip the left section
- Grab 1-2 inches at the hairline and divide into three strands
- Begin French braiding using the over-over pattern
- Add small sections of hair as you cross each side
- Work your way down to the nape
- Finish with a regular three-strand braid
- Secure with an elastic
Helpful tip: Tilt your head slightly to the left as you braid the left side. This makes it easier to see what you’re doing and helps keep consistent tension.
The goal is to match the thickness and tightness of your first braid. Don’t worry if they’re not perfectly identical—honestly, slightly mismatched braids often look more natural and relaxed.
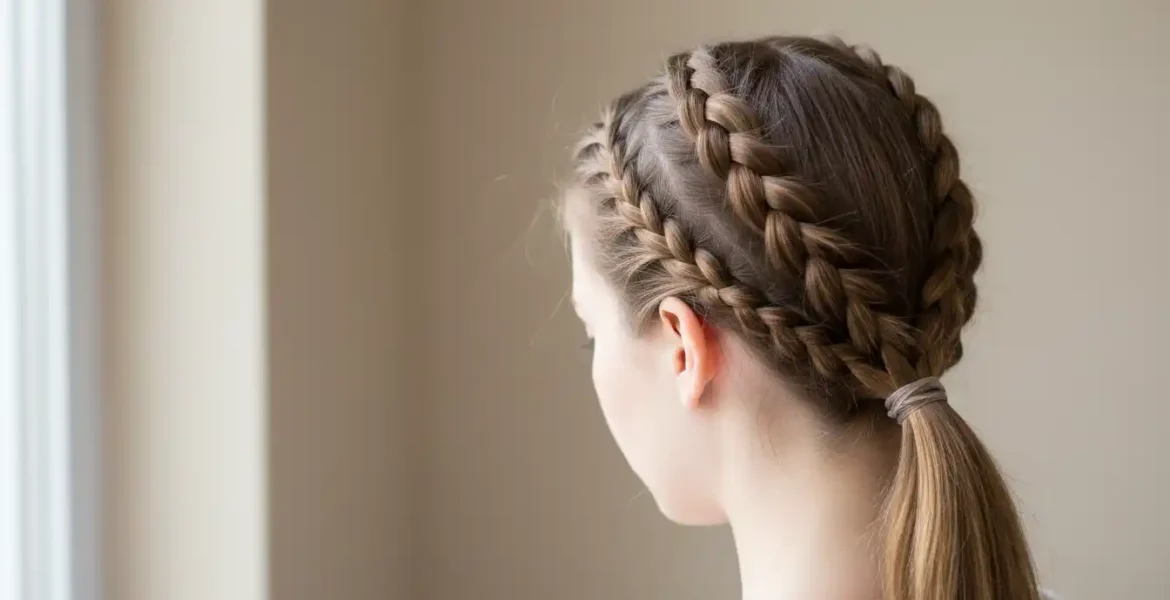
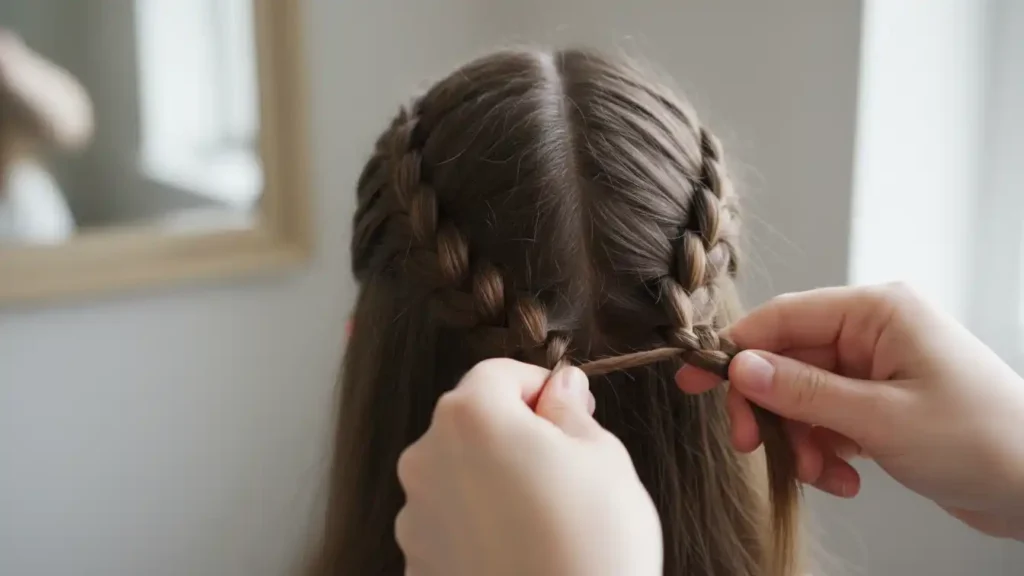
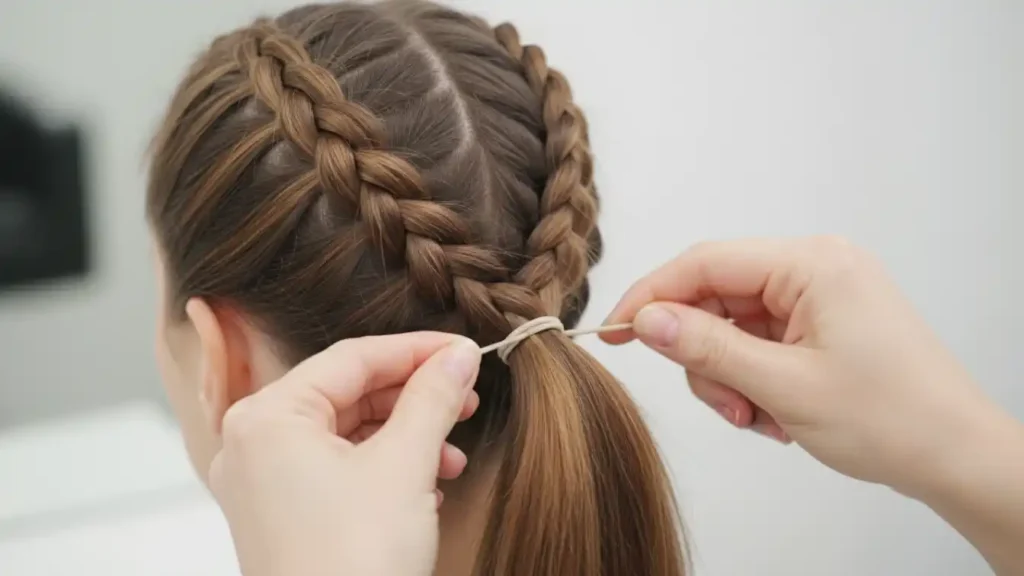
Step 7: Join the Braids into a Ponytail
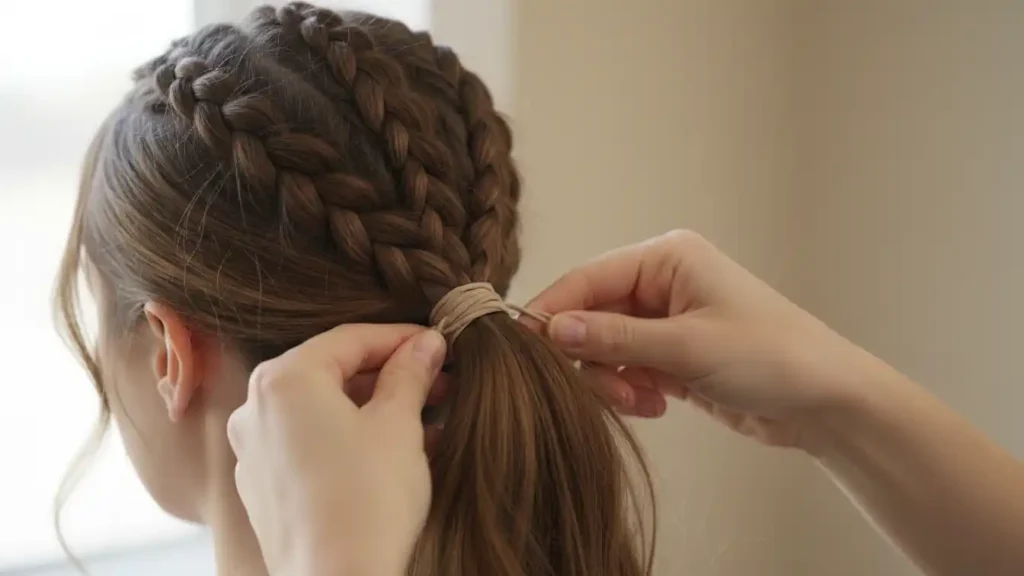
This is where the magic happens!
Here’s how to combine everything:
- Hold both braids together at the back of your head
- If desired, gently tug on the edges of each braid to loosen them slightly (called “pancaking”)
- Decide where you want your ponytail—high, medium, or low
- Use a larger hair elastic to secure both braids together into one ponytail
You might need to adjust the placement a few times to get it exactly where you want it. That’s totally normal—just slide the elastic around until you’re happy with the height.
Ponytail placement guide:
- High ponytail: More athletic and youthful—great for workouts
- Mid-level ponytail: Versatile and classic—works for almost any occasion
- Low ponytail: Elegant and sophisticated—perfect for formal events
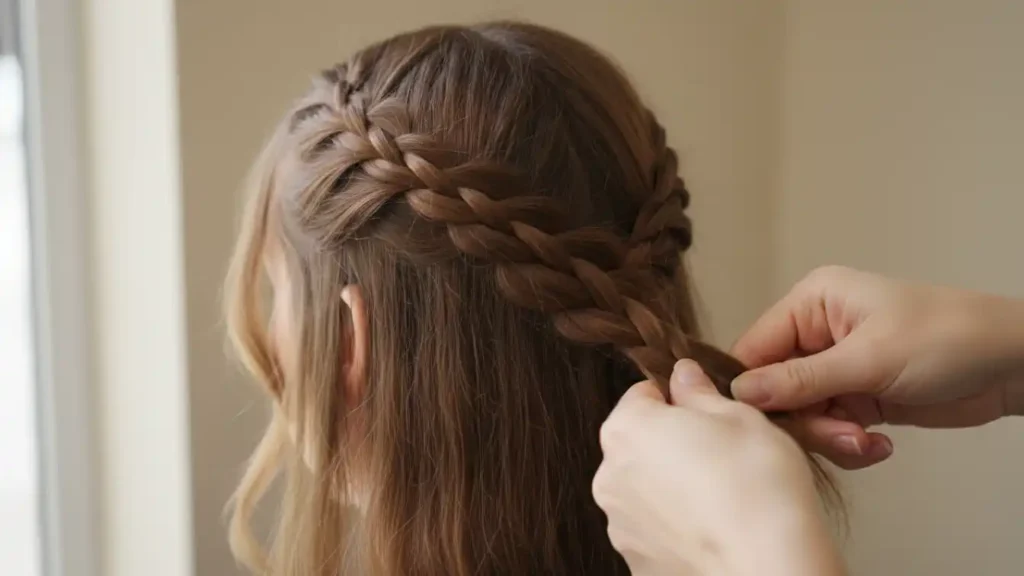
Step 8: Polishing and Final Touches
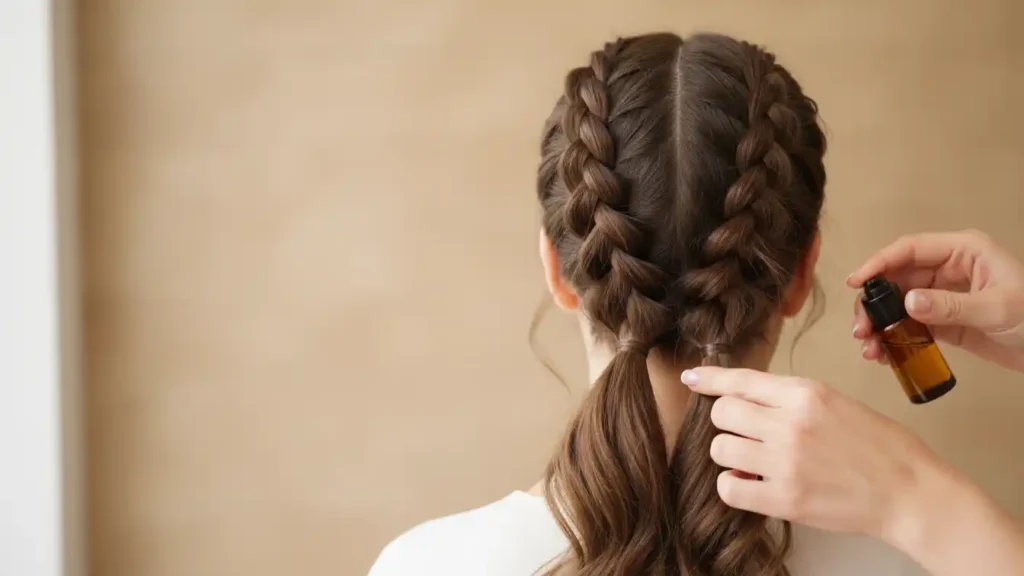
Now let’s make this hairstyle look absolutely stunning.
Optional styling techniques:
For a sleek, polished look:
- Use a small amount of shine serum or oil on the braids
- Smooth down any flyaways with hairspray on your fingertips
- Wrap a small section of hair from the ponytail around the elastic to hide it, securing with a bobby pin underneath
For a romantic, soft look:
- Pull gently on the edges of the braids to make them wider and more textured
- Leave a few face-framing pieces out
- Let the ponytail be slightly messy rather than perfectly smooth
For extra security:
- Add bobby pins along the braids if you feel any loose sections
- Mist everything with medium-hold hairspray
- Use a texturizing spray on the ponytail for added volume
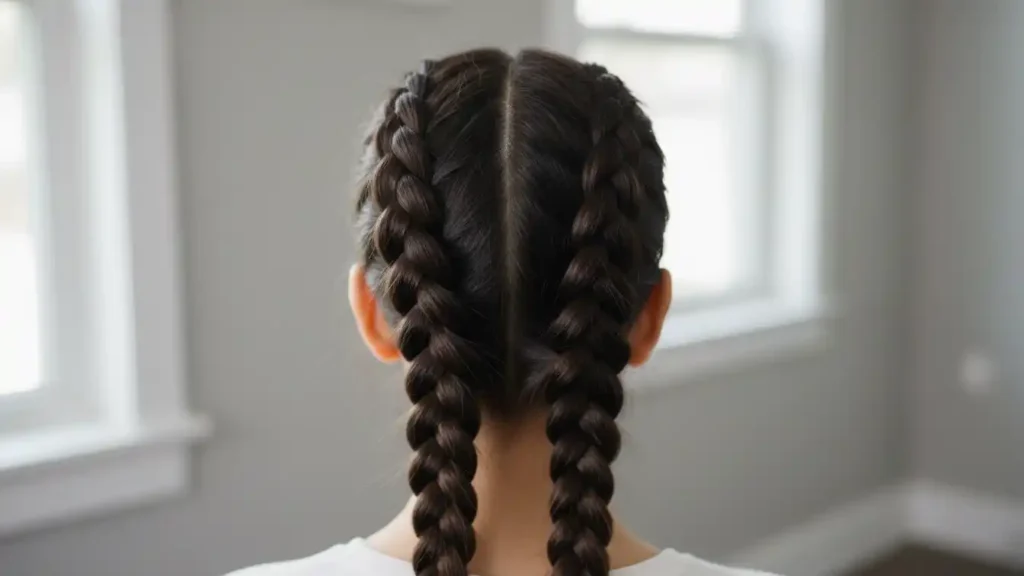
And that’s it! You just created a gorgeous double French braid ponytail.
Troubleshooting Common Problems
Let’s talk about the issues you might run into—and how to fix them.
Problem #1: My Braids Keep Coming Loose
Solution: You’re probably not maintaining enough tension. As you braid, keep a steady, firm pull—not painfully tight, but snug. Also, make sure you’re using texturizing spray on slippery hair.
Problem #2: The Braids Are Uneven
Solution: This usually happens when you’re grabbing different amounts of hair on each side. Try to be consistent with the size of sections you add. Practice makes perfect on this one!
Problem #3: I Can’t See What I’m Doing
Solution: Set up a large mirror in front of you with a smaller hand mirror behind you. This lets you see the back of your head while you work. You can also try tilting your head or doing the braids slightly to the side first, then adjusting.
Problem #4: My Arms Get Tired
Solution: Take breaks! Do one braid, rest your arms, then do the second braid. As you practice, your arm endurance will improve. I also recommend sitting down rather than standing.
Problem #5: Too Many Flyaways
Solution: Use a light hairspray or gel on your fingers to smooth down strays as you go. You can also run a toothbrush with hairspray over the braids at the end to tame any wild pieces.
How to Customize Your Double French Braid Ponytail
One of the best things about this tutorial is how adaptable the style is. Here are some variations to try:
For Athletic Activities
Make your double French braid ponytail tutorial workout-proof:
- Braid tightly for maximum security
- Use sport-specific hair ties that won’t slip
- Create a high ponytail so it doesn’t hit your back during running
- Skip the pancaking and face-framing pieces—keep everything tight and controlled
- Finish with strong-hold hairspray
This is my go-to style for running, CrossFit, or any intense workout. Nothing moves, nothing falls out, nothing gets in my face. Perfect.
For Formal Events
Elevate your braided ponytail for weddings or fancy occasions:
- Use shine serum for extra glossiness
- Create a low ponytail for an elegant look
- Pancake the braids for soft, romantic texture
- Wrap a section of hair around the elastic to hide it
- Add hair accessories like pearl pins or delicate flowers
- Curl the ponytail itself for added glamour
For Casual, Everyday Wear
Keep it relaxed and effortless:
- Leave the braids slightly messy and textured
- Pull out a few face-framing pieces
- Create a medium-height ponytail
- Don’t worry about perfection—casual looks better anyway
- Add a cute scrunchie or ribbon
For Creative, Festival Vibes
Get playful with your style:
- Weave colorful ribbons through the braids
- Add temporary hair chalk for pops of color
- Include small braids within the larger French braids
- Wrap the ponytail with metallic thread or chains
- Use glitter spray for sparkle
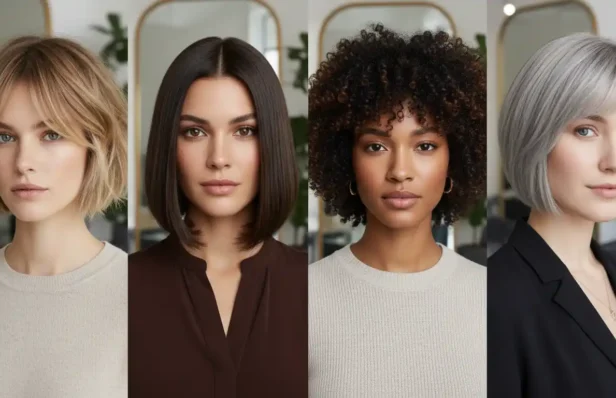
Different Hair Types, Same Great Style
The double French braid ponytail tutorial works on virtually all hair types—you just might need to adjust your approach slightly.
Straight Hair
Pros: Easy to braid, clean lines, sleek finish
Tips:
- Definitely use texturizing spray for grip
- Pancake the braids if you want more volume
- Consider leaving face-framing pieces out to soften the look
Wavy Hair
Pros: Natural texture helps braids hold better, creates beautiful dimension
Tips:
- Embrace the texture—don’t fight it
- The natural wave will make your braids look fuller
- May not need as much product
Curly Hair
Pros: Gorgeous texture, full-looking braids, excellent hold
Tips:
- Work with slightly damp hair or use a leave-in conditioner
- Detangle thoroughly before starting
- The braids might be a bit fuzzier—that’s actually beautiful!
- May want to stretch or blow out hair first for easier braiding
Thick Hair
Pros: Creates impressively full braids, lots to work with
Tips:
- Take your time—thick hair requires patience
- You might want to create slightly larger sections
- Use strong hair elastics that can handle the volume
- May need extra bobby pins to secure
Fine Hair
Pros: Lightweight and easy to manipulate
Tips:
- Definitely pancake the braids to create the illusion of thickness
- Use volumizing products at the roots before starting
- Texturizing spray is your best friend
- Consider adding dry shampoo for extra grip and fullness
Time Management: How Long Will This Take?
Let’s be real about the time commitment.
First attempt: 30-45 minutes (completely normal!)
After 3-4 practices: 15-25 minutes
Once you’re experienced: 10-15 minutes
Speed-saving tips:
- Prep your hair the night before (brush it out, apply product)
- Keep all your supplies in one place
- Don’t aim for perfection—slightly messy looks better anyway
- Practice the French braid technique on just one side until you’ve got the muscle memory down
The morning time crunch is real, I get it. But even at 15 minutes, this style is worth it compared to a basic ponytail that takes 2 minutes. The extra 13 minutes makes you look like you actually tried, which feels good.
Products That Make a Difference
You don’t need a ton of products, but the right ones genuinely help.
Best texturizing products: Dry shampoo, texturizing spray, or sea salt spray all add the grip that makes braiding easier. Apply to clean hair before you start.
Best hair elastics: I swear by spiral hair ties for the ponytail—they hold without creating creases or pulling. For the braids, clear elastics work great.
Best hairspray: Look for flexible hold rather than super stiff. You want your hair to hold but still move naturally. Spray from about 12 inches away.
Best bobby pins: Match them to your hair color, use the wavy side down for better grip, and don’t be afraid to use plenty of them.
Styling for Different Occasions
| Occasion | Ponytail Height | Braid Texture | Key Features | Time Needed |
| Workout/Gym | High | Tight, secure | Strong hold, minimal flyaways | 10-15 min |
| Office/Work | Mid to Low | Neat, polished | Smooth finish, professional | 15-20 min |
| Casual Weekend | Mid | Relaxed, textured | Messy, face-framing pieces | 12-18 min |
| Formal Event | Low | Soft, romantic | Pancaked braids, wrapped elastic | 20-30 min |
| Date Night | Mid | Textured, glamorous | Curled ponytail, shine serum | 20-25 min |
| Athletic Competition | High | Very tight | Maximum security, strong spray | 15-20 min |
Frequently Asked Questions
Q: Should I braid with wet or dry hair?
A: Dry hair or slightly damp hair works best. Soaking wet hair is too slippery and won’t hold the braid well. If your hair is wet, rough-dry it first until it’s about 80% dry.
Q: How do I keep the center part straight?
A: Use your nose as a guide! Line up the part with the center of your nose and forehead. If you’re still struggling, try parting your hair while it’s wet and let it dry that way—the part will be more defined.
Q: Can I do this on short hair?
A: If your hair is at least chin-length, you can do the braids and then pin them together instead of creating a ponytail. It won’t look exactly the same, but it’s still a beautiful style.
Q: My braids look lumpy. What am I doing wrong?
A: Lumps usually mean uneven tension. Make sure you’re pulling consistently as you braid—same firmness throughout. Also, try adding smaller, more equal sections of hair each time.
Q: How long will this style last?
A: With proper hairspray and bobby pins, this hairstyle easily lasts 8-12 hours. I’ve worn it all day at work and then out to dinner without needing to fix it. For super active days, just add extra bobby pins and hairspray.
Q: Can I sleep with this hairstyle?
A: You can, but I don’t really recommend it as a sleeping style. The braids and ponytail might get uncomfortable and flattened. If you must sleep in it, cover with a silk scarf.
Q: What if I have bangs?
A: You can either leave your bangs out to frame your face, or incorporate them into the braids if they’re long enough. Both look great—it’s personal preference!
Advanced Tips for Perfecting Your Technique
Once you’ve mastered the basics, try these expert techniques:
The Pancaking Method
After your braids are complete, gently pull on the outer edges of each section to make them wider and fluffier. Start from the bottom and work your way up. This creates that coveted full, textured look you see on Instagram.
Just be gentle—pull too hard and you’ll mess up the entire braid.
Creating Volume at the Crown
Before you start braiding, tease the hair at your crown slightly with a comb. This adds height and prevents that flat, deflated look. Smooth over the teased section gently before beginning your braids.
The Elastic-Hiding Trick
For a more polished finish, take a small section of hair from the underside of your ponytail and wrap it around the elastic. Secure the end with a bobby pin underneath where it’s hidden. This looks so much more professional than a visible hair tie.
Strategic Bobby Pin Placement
Insert bobby pins with the wavy side facing down—they grip better that way. Cross two pins in an X shape for maximum hold. Place them along the braids wherever you feel any looseness or gaps.
When to See a Professional
Most people can absolutely learn this style at home, but here are situations where professional help makes sense:
- You have a major event (like your wedding) and want it absolutely perfect
- You have extremely long or thick hair and your arms genuinely can’t handle the process
- You’ve practiced multiple times and still can’t get both braids even
- You want a more complex variation that combines this with other techniques
Even if you end up going to a salon for special occasions, learning this tutorial means you can recreate simpler versions for everyday wear.
The Confidence Factor
Here’s something nobody talks about enough: mastering a skill like this genuinely boosts your confidence.
When you look in the mirror and see a beautiful hairstyle you created yourself, something shifts. You feel capable. Creative. Put-together.
And other people notice. I can’t tell you how many compliments I get when I wear this style—and the best part? I get to say, “Thanks! I did it myself.”
That feeling never gets old.
Your Practice Plan
Want to actually master this style instead of just reading about it? Here’s your step-by-step practice schedule:
Week 1: Focus on mastering the basic French braid on just one side. Don’t worry about the ponytail yet—just practice the braiding technique until it feels natural.
Week 2: Practice creating matching braids on both sides. Work on making them symmetrical and even.
Week 3: Combine the braids into the ponytail. Experiment with different ponytail heights and styles.
Week 4: Focus on speed and finishing touches. Time yourself and work on creating a polished final look.
By the end of the month, this double French braid ponytail will be second nature.
Beyond the Basic: Related Styles to Try
Once you’ve nailed this tutorial, you’ve unlocked skills that transfer to tons of other braided hairstyles:
- Fishtail braids use a similar adding-hair technique
- Dutch braids (reverse French braids) for a different dimensional look
- Crown braids that wrap around your head
- Half-up styles that use the same braiding technique
- Waterfall braids for romantic occasions
The French braiding technique you’re learning here is foundational—it opens up an entire world of hairstyling possibilities.
Final Thoughts
Listen, I’m not going to pretend this double French braid ponytail is effortless from day one.
Your first attempt might be crooked. The braids might be uneven. The ponytail might sit at a weird angle.
That’s completely okay.
Every single person who now creates flawless braided ponytails in their sleep started exactly where you are right now. Awkward, uncertain, learning.
The difference is they kept practicing.
What I love most about this tutorial is that it’s practical. This isn’t some Pinterest fantasy hairstyle you’ll never actually wear—it’s a real, functional style you can use for work, workouts, weekends, and special events.
You’re not just learning one hairstyle. You’re building a skill that makes you feel more capable and confident every time you use it.
Ready to Try It Yourself?
Here’s my challenge: set aside 30 minutes this weekend and attempt it.
Don’t compare your first try to the perfect hairstyles you see on social media. Those stylists have years of practice and professional lighting.
Just grab your hairbrush, some hair elastics, and give it a shot.
Take a picture of your first attempt. I promise you’ll want to look back on it in a few months when you’re creating gorgeous double French braid ponytails without even thinking about it.
Remember: everyone starts as a beginner. The only way to become good at braiding is to actually do it—messy attempts and all.
You’ve got this.
Now get out there and create something beautiful!